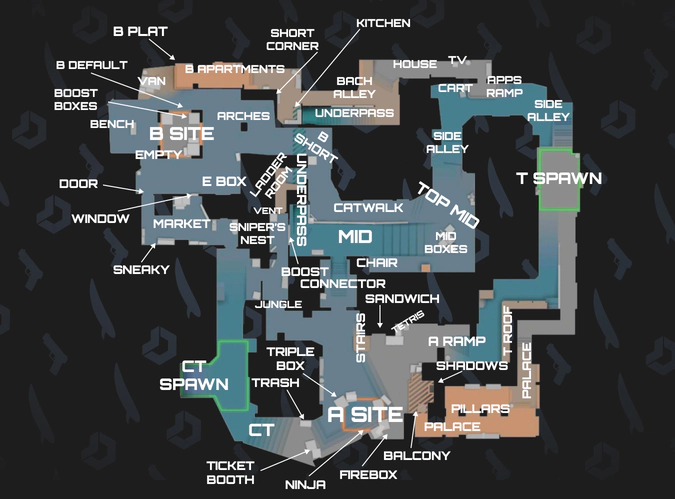
In the competitive world of Counter-Strike 2, clear communication is key, and mastering Mirage Callouts in CS2 can give your team the edge it needs to succeed. Knowing the precise names for every position on Mirage allows players to relay crucial information quickly, enhancing coordination during high-pressure moments. From identifying key mid positions to understanding bombsite callouts and defensive rotations, learning these callouts can elevate your gameplay. Whether you’re crafting tactical smokes or improving overall communication, this guide will help you navigate and dominate Mirage with confidence.
Understanding Mirage Callouts
Mirage callouts in CS2 are specific terms used by players to identify distinct locations on the Mirage map. These callouts are vital for effective team communication, allowing players to relay critical information during gameplay. Whether it’s calling out an enemy’s location, coordinating a strategy, or planning rotations, knowing these terms can make or break a match.
Some commonly used callouts include:
- T Spawn: Terrorist spawn area.
- A Ramp: Entry point leading to A bombsite.
- Connector: Path connecting Mid to A bombsite.
- B Apartments: Path leading towards B bombsite.
- CT Spawn: Counter-Terrorist spawn area, often a key rotation point.
Mastering Mirage callouts in CS2 requires practice, but it brings numerous advantages: quicker reactions, precise strategies, and better teamwork. Players should make an active effort to learn these terms as they play the map repeatedly.
In summary, understanding Mirage callouts serves as the groundwork for improved communication and teamwork, giving you an edge against opponents.
Key Mid Positions on Mirage
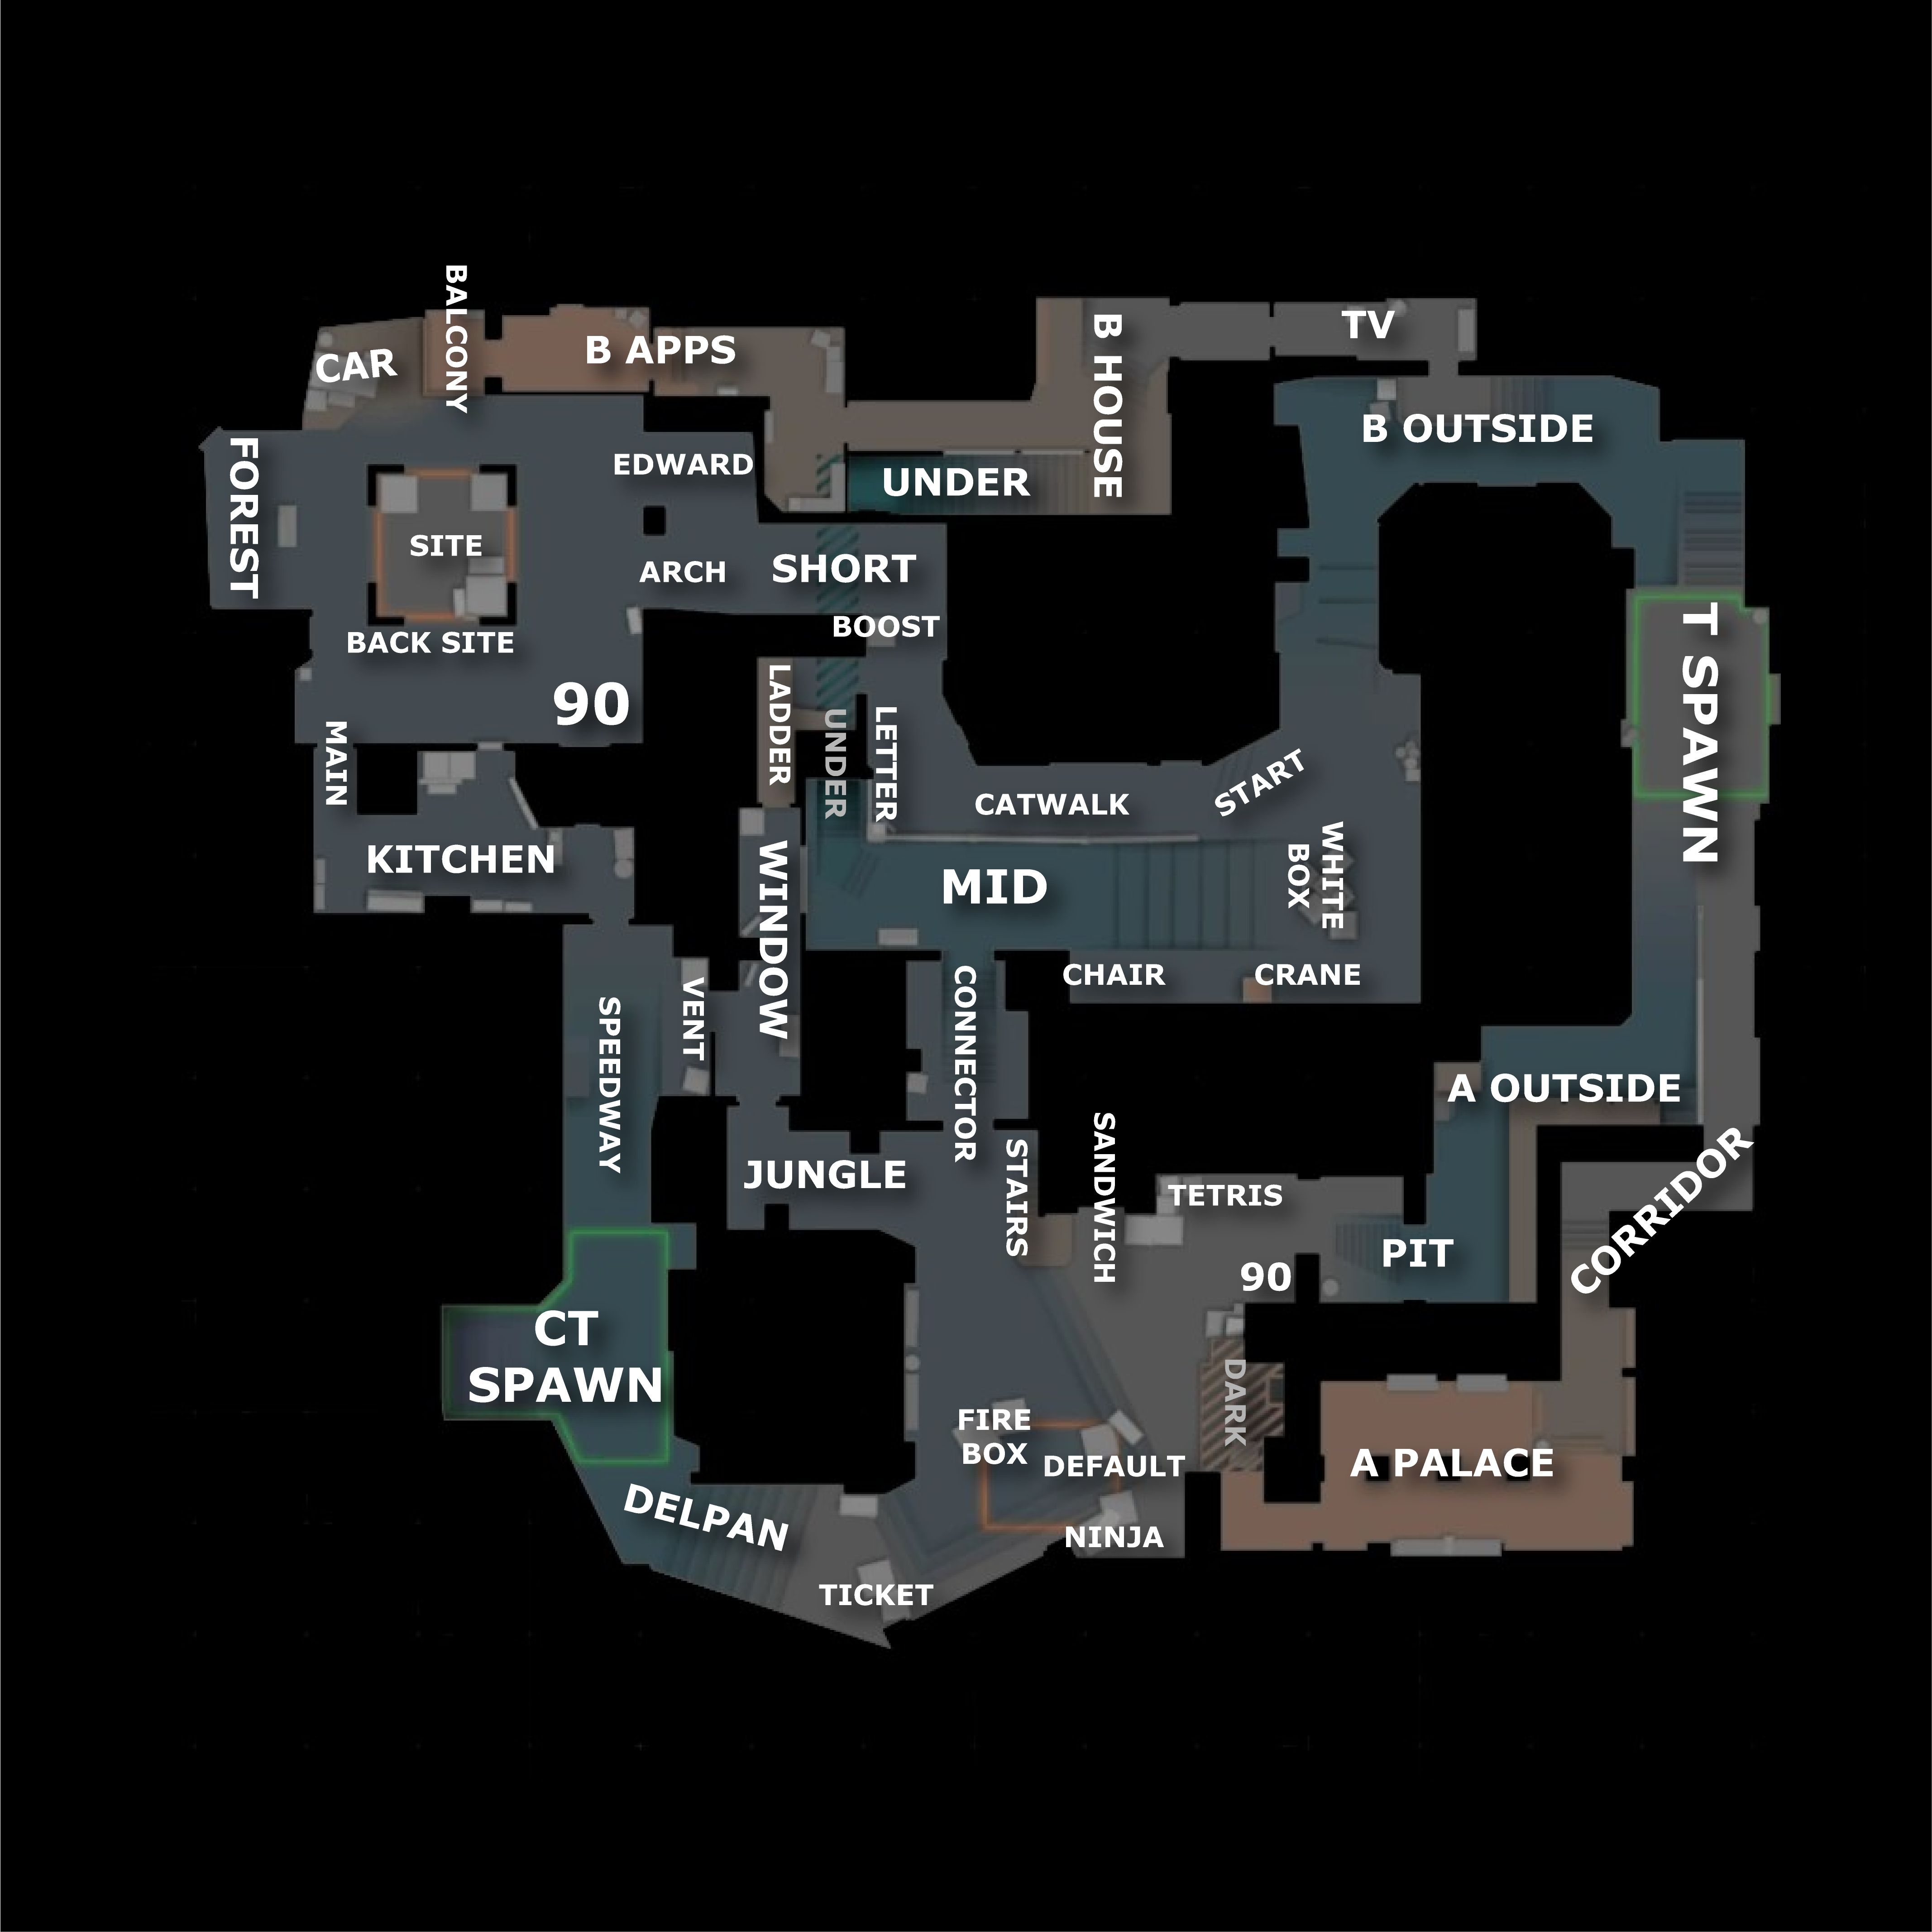
Understanding key mid positions is essential for mastering Mirage Callouts in CS2. Mid control often determines the pace of the game, offering numerous strategic opportunities for both attackers and defenders. Below are vital mid callouts you should know:
- Top Mid (T Mid): A popular spot where terrorists aim to take early control. This position provides sightlines into mid and catwalk.
- Window: A defensive position at CT Mid that offers a prime vantage point for visibility across mid. It’s crucial to smoke this area effectively as terrorists.
- Connector: Located between mid and A-site, it’s a heavily contested passage that is significant for rotations and split-site takes.
- Ladder Room: Situated near short and catwalk, this elevated position allows defenders to control mid and B approaches effectively.
By mastering these key callouts, you’ll optimize your team’s coordination. Control of mid often directly influences success, making it a critical area in Mirage Callouts in CS2. Perfecting smokes and timing here can give your team the upper hand.
Essential Bombsite Callouts for Mirage
Mastering bombsite callouts is critical for strategic gameplay in Mirage. Understanding these specific callouts will enhance your team’s coordination and efficiency. In Mirage Callouts in CS2, Bombsite A and B each have intricate sections that require clear communication.
- Bombsite A:
- Tetris – A stack of boxes near the ramp, offering cover for attackers.
- Palace – The elevated entryway where attackers might peek onto the site.
- Firebox – A corner ideal for hiding or staging a surprise attack.
- Default Plant – The most common area to plant the bomb on A.
- Bombsite B:
- Van – A vehicle offering cover near the entry point.
- Bench – Positioned for both defense and offense during a plant.
- Apartments (Apps) – Upper-level entry from Terrorist spawn that opens onto B.
- Short – The close-mid position to either rotate to B or contest the site.
Familiarizing yourself with these essential locations will make your calls quick and effective. Precise Mirage Callouts in CS2 play a vital role during both attacking and clutch defending scenarios.
Defensive Positions and Rotations
Understanding defensive positions and rotations is essential when mastering Mirage Callouts in CS2. Effective defense relies heavily on positioning and timely rotations to counter enemy strategies. Here’s an overview of key defensive spots and when to rotate.
Key Defensive Positions:
- A-Site: Hold angles like “CT” (near the ticket booth) or “Jungle” for better site control. “Default” is another vital position but vulnerable without proper backup.
- B-Site: Positions such as “Bench” and “Van” offer advantageous holding points. Pair these with “Market” to react quickly during B pushes.
- Mid: Controlling areas like “Window” and “Connector” provides the ability to pivot to either site or delay mid-play aggression.
When to Rotate:
- Rotate early if there’s reliable intel from teammates (example: spotting multiple opponents rushing A Ramp).
- Over-rotating can leave other sites exposed. Maintain a balance by leaving one player nearby.
Proper knowledge of these defensive callouts ensures smoother communication and cohesive team rotations. With consistent practice, you can make Mirage Callouts in CS2 a core strength in your competitive gameplay.
Tactical Callouts for Mirage Smokes
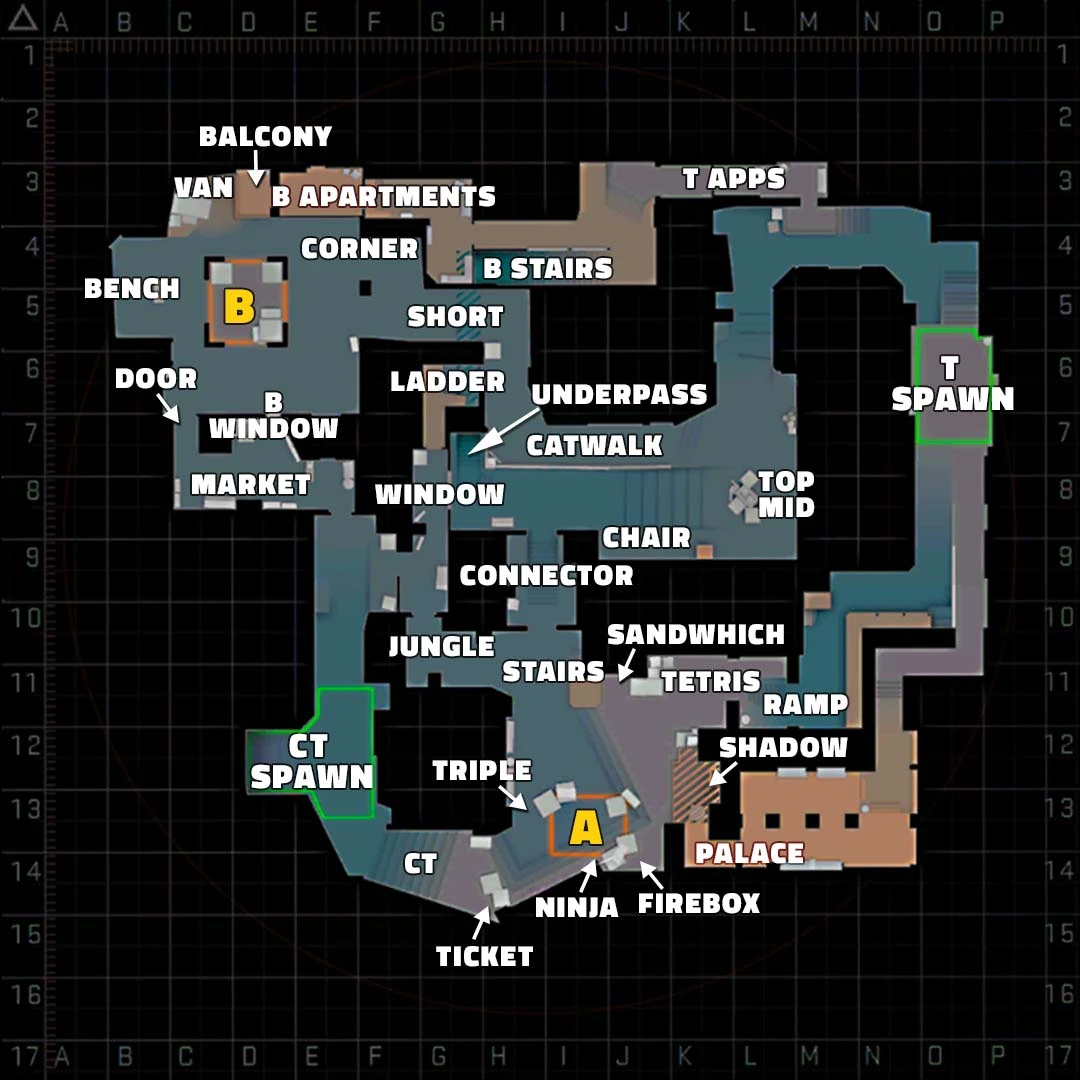
Utilizing Mirage Callouts in CS2 for smokes can significantly improve your game strategy and map control. Smokes are instrumental in blocking enemy vision, isolating duels, and executing coordinated attacks or defenses. Understanding tactical smoke spots and their corresponding callouts ensures seamless communication within your team.
Here are some key smoke callouts on Mirage:
- Top Mid Smoke: Helps to block the sniper’s view from Window, allowing safer map control.
- Connector Smoke: Essential for cutting off rotations between Mid and A bombsite.
- Stairs Smoke: Blocks visibility for defenders holding A site, improving success rates during site entry.
- Jungle Smoke: Prevents opponents at Jungle from assisting teammates or denying bomb plants.
These smokes, combined with effective Mirage Callouts in CS2, create room for executing versatile strategies. For instance, “Smoke Jungle and Stairs” can set the stage for an A site take, while a well-timed Top Mid Smoke supports Mid control and transitions. Practice these callouts in scrims or solo to master their placement and enhance in-game communication.
Improving Communication with Mirage Callouts
Effective communication is crucial in competitive play, and understanding Mirage callouts in CS2 can significantly boost your team’s coordination. Clear, concise callouts help every teammate quickly grasp the situation, reducing response times during intense moments.
Here’s how to enhance communication with Mirage callouts:
- Practice consistency: Stick to standard callout names like “Tetris,” “Connector,” or “Catwalk” to avoid confusion among teammates. Using universally recognized terms ensures clarity across teams.
- Keep it brief: Instead of long descriptions, opt for short and precise information such as “One Tetris” or “Two underpass.”
- Layer in details only when needed: Start with essential info like enemy positions, and add details about health or utility if time permits.
- Use audio cues: Combine callouts with confirmed sound cues, e.g., “Footsteps Bench.”
Strong communication using Mirage callouts in CS2 not only tightens gameplay but also keeps the team organized, especially in high-pressure situations. Start practicing with your squad to build fluency and efficiency in callouts. Your team performance will undoubtedly improve as everyone stays on the same page.
Frequently Asked Questions
What are Mirage callouts in CS2?
Mirage callouts in CS2 refer to the commonly used names and labels given to specific locations and areas on the Mirage map in Counter-Strike 2 (CS2). These callouts are used to communicate effectively with your teammates during gameplay, helping to provide accurate information about enemy locations, bomb sites, and other strategic points. Knowing these callouts can significantly improve team coordination and gameplay performance.
Why are callouts important on Mirage?
Callouts on Mirage are important because they enable players to relay precise information to their team. The Mirage map has many distinct areas, such as ‘A Ramp,’ ‘Palace,’ and ‘Market,’ which can affect the strategy and decision-making during a match. Using standardized callouts ensures that teammates can quickly understand one another, react to threats, and execute strategies efficiently, whether they are attacking or defending.
How can I learn all the Mirage callouts in CS2?
To learn Mirage callouts in CS2, you can start by studying a labeled map of Mirage, which highlights all the key locations and their corresponding names. Practice using these callouts during matches to reinforce your memory. Additionally, watching professional players or content creators can help you understand how these callouts are applied in action. Repeatedly playing on Mirage and consciously using the callouts with teammates will solidify your knowledge.
Are there any changes to Mirage callouts in CS2 compared to CS:GO?
In CS2, the core layout and major callouts for Mirage generally remain consistent with those in CS:GO. However, slight visual and gameplay changes in CS2 might introduce new terms or adapt existing callouts to fit updated areas. It’s essential to stay updated on any community consensus or modifications to avoid confusion when communicating during matches.
After you shortlist a finish, compare live CS2 skin prices on CSOffer me and complete the trade on Skin.Trade.