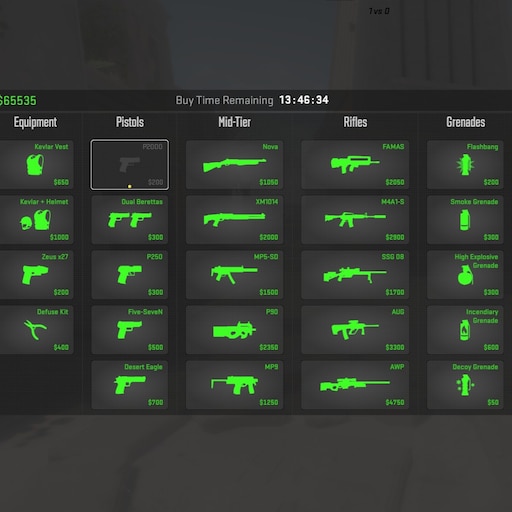
In the fast-paced world of Counter-Strike 2, mastering CS2 Buy Binds can be a game-changer for your overall performance. These custom settings streamline your weapon purchases, saving precious seconds during crucial moments. Whether you’re a seasoned player or new to the scene, understanding how buy binds work and adapting them to your playstyle can significantly enhance your efficiency and competitiveness. By taking the time to set up effective CS2 Buy Binds, you gain a strategic edge, ensuring you’re always prepared for action when the round begins. Let’s dive into everything you need to know about optimizing your buy binds.
Understanding CS2 Buy Binds
CS2 Buy Binds are an essential tool to enhance your gameplay in Counter-Strike 2. Essentially, buy binds allow players to purchase weapons, utilities, and gear with a single key press, avoiding the need to navigate the in-game buy menu manually. This is incredibly useful, especially during fast-paced rounds where every second counts.
The concept is straightforward: each buy bind is linked to a specific item or set of items. Instead of memorizing the keystrokes for each individual purchase, you can assign binds to keys or key combinations for an efficient buying process. For example, a single key could automatically buy a rifle and armor, saving you valuable time at the start of a round.
Benefits of understanding CS2 Buy Binds include:
- Faster purchases: Get fully equipped and ready for action in seconds.
- Improved efficiency: Stay focused on your strategy instead of the buy menu.
- Customization: Tailor binds to suit your preferred loadout and playstyle.
Mastering CS2 Buy Binds ensures smoother rounds and keeps your attention where it matters most – on the game.
Why Buy Binds are Important in CS2
In a fast-paced game like CS2, every second matters. CS2 Buy Binds allow players to purchase weapons, armor, and utility with a single keypress instead of navigating the buy menu, significantly reducing time spent purchasing items. This is especially crucial in the early seconds of each round, where swift decisions can directly influence your positioning and strategy.
Here are the main reasons why CS2 Buy Binds are essential:
- Speed and efficiency: Quickly equipping your loadout gives you more time to focus on team communication and positioning.
- Consistency: Binds ensure you never forget to buy critical items like armor or utility, preventing costly mistakes.
- Reduced errors: Manually selecting items can lead to misclicks, but buy binds eliminate such risks.
For competitive players, shaving even half a second off their buy phase can give a strategic edge, especially in tight matches. Whether you’re a beginner or an advanced player, optimizing with CS2 Buy Binds can elevate your gameplay and decision-making.
Setting Up Your Buy Binds
Configuring your CS2 Buy Binds is essential in ensuring a faster and more efficient buying process during the game. By setting up custom binds, you can purchase your preferred weapons and gear quickly without wasting time navigating the buy menu.
Follow these steps to set up your buy binds in CS2:
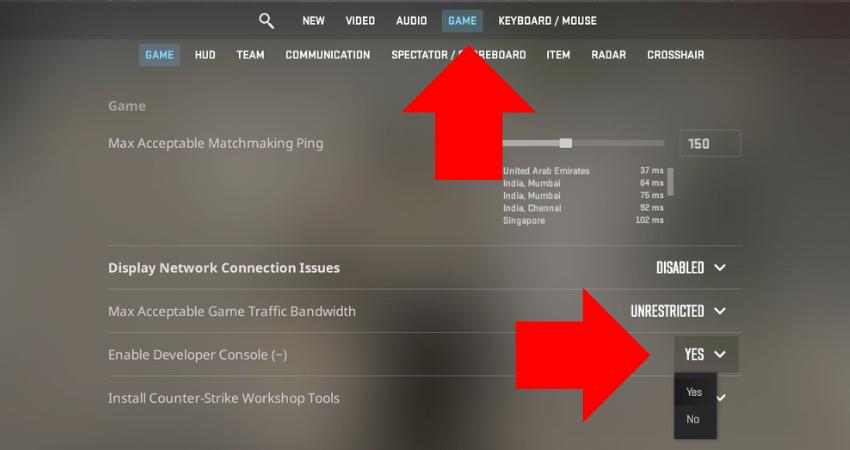
- Open the Console: First, enable the developer console in the settings menu and assign it to a key (typically ‘~’ for convenience).
- Access Your Config File: Locate the config file, which is usually found in the CS2 installation folder. You can edit this file to set detailed buy binds.
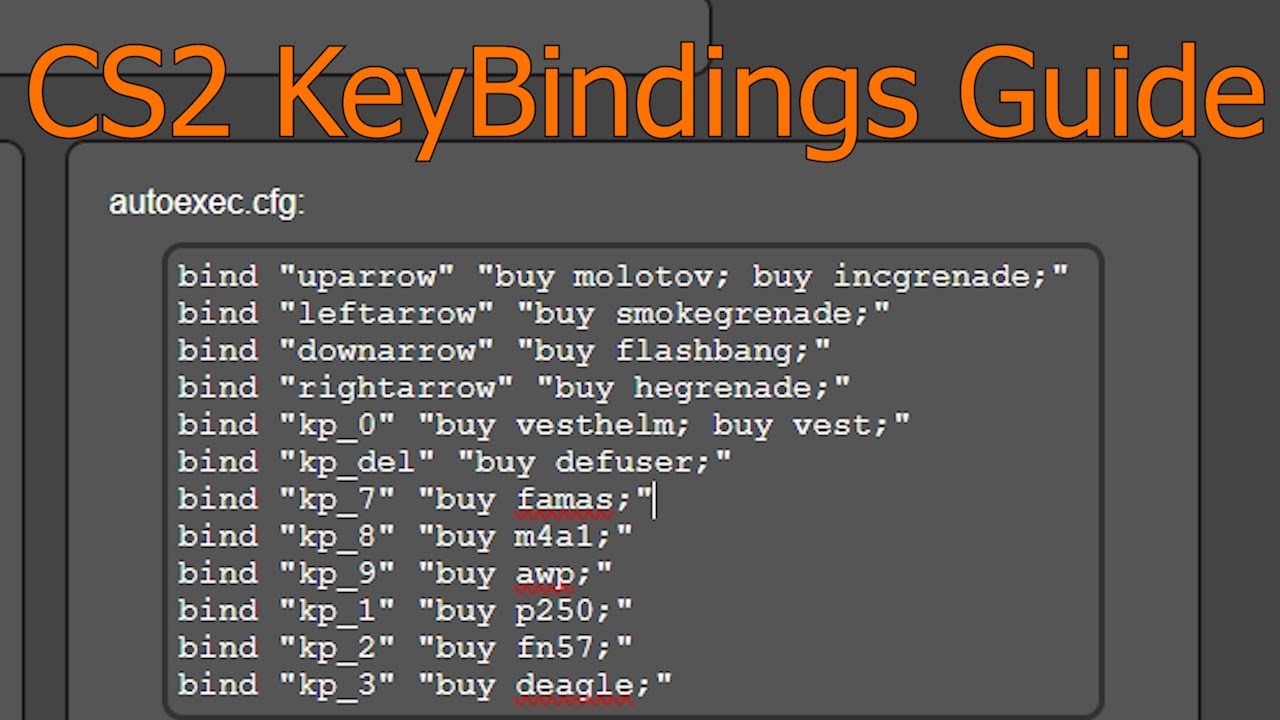
- Input Buy Commands: Use the bind command followed by the key and the desired item. For instance:
This example binds the AK-47 and a flashbang to the F1 key.bind "F1" "buy ak47; buy flashbang" - Save & Test: Save the changes and test the binds in a private match. Fine-tune where necessary.
With proper CS2 Buy Binds, you’ll gain precious seconds during buy phases, allowing for better focus on gameplay strategy.
Best Practices for Efficient Buy Binds
To make the most out of your CS2 Buy Binds, following best practices is essential. A well-organized buy bind setup can save you time and streamline your gameplay, especially during high-pressure moments in a match.
Here are some key tips for creating efficient buy binds:
- Prioritize your essential purchases: Bind commonly bought items like weapons, armor, and utility to easy-to-reach keys for faster access.
- Group related items: Group grenades (flash, smoke, molotov) or rifles (AK, M4) together on adjacent keys for quick execution.
- Use modifier keys: Combine keys like Shift or Alt with primary keys to expand the number of buy options, minimizing clutter.
- Avoid overly complex configurations: Keep your binds simple enough to prevent confusion during intense matches.
- Test in practice mode: Before employing your binds in competitive play, try them in practice to ensure seamless usage.
By optimizing your CS2 Buy Binds with these practices, you can reduce mistakes and focus on your gameplay. Always remember, consistency is critical for long-term proficiency!

Common Mistakes to Avoid with Buy Binds
When setting up your CS2 Buy Binds, even small mistakes can lead to frustrating in-game moments. Avoiding these missteps ensures a smoother and more effective gameplay experience. Here are some common errors and tips to sidestep them:
- Overcomplicating Your Binds: Creating too many buy binds or assigning complex key combinations can slow you down. Stick to simple and intuitive setups.
- Overlapping Key Assignments: Check if your bind keys conflict with other game functions. Overlapping keys can disrupt both purchasing and gameplay.
- Ignoring Team Composition: Blindly buying the same loadout every round might not support your team’s strategy. Adapt binds for flexibility.
- Forgetting to Test: Neglecting to test buy binds in casual or practice matches can result in costly mistakes during competitive play.
- Failing to Update Binds: As your playstyle evolves, outdated binds might hold you back. Periodically review and adjust them.
By carefully avoiding these pitfalls, you can make full use of your CS2 Buy Binds, enhancing your efficiency and adaptability in every round.
Advanced Buy Bind Strategies for Competitive Play
To truly excel in competitive matches, mastering advanced strategies for CS2 Buy Binds can make a noticeable difference in your efficiency and gameplay. Here are a few tactics that top-tier players use to stay ahead:
- Role-Specific Bind Layouts: Tailor your buy binds based on your role in the team. For instance, support players might prioritize grenades, while entry fraggers might bind rifles and armor for quick purchases.
- Preset Eco Binds: In situations of limited resources, having dedicated binds for eco buys (like pistols and light armor) ensures rapid purchasing, letting you focus on strategy.
- Adaptable Secondary Binds: Create backup buy binds for different scenarios, such as switching between an AWP or a rifle, depending on the round’s needs.
Additionally, syncing your CS2 Buy Binds with communication improves team cohesion. For instance, quick buys let you drop weapons for teammates without delay. By implementing these advanced setups, you’ll find that your team benefits from quicker preparation and stronger coordination during matches.
Customizing Buy Binds for Your Playstyle
Customizing CS2 Buy Binds to align with your playstyle can significantly improve your in-game performance and responsiveness. CS2 allows players the flexibility to tailor their binds for faster and more intuitive purchases, giving you an edge during intense moments.
To customize your buy binds effectively, consider the following tips:
- Analyze your role: If you’re a rifler, prioritize binds for rifles, grenades, and armor. For AWPers, sniper rifles should take precedence. This ensures that your role’s necessities are always a keypress away.
- Prioritize commonly used items: Consider binding essentials like the AK-47, M4, or utility grenades to easily accessible keys.
- Experiment with configurations: Spend some time testing various setups during practice sessions to find one that feels natural and efficient.
- Utilize available buttons: Don’t overlook additional mouse buttons or unused keyboard keys for extra binds.
Personalizing CS2 Buy Binds should focus on speed and convenience. A well-configured setup can reduce the time spent in buy menus and prepare you to jump into action quicker, aligning perfectly with your playstyle preferences.
Frequently Asked Questions
What are buy binds in CS2?
Buy binds in CS2 (Counter-Strike 2) are custom key configurations that allow players to quickly purchase weapons, grenades, and other equipment during the buy phase of a match. Instead of navigating the in-game buy menu, players simply press a pre-assigned key to instantly purchase specific items. This feature helps save time, allowing players to focus on strategizing and preparing for the round ahead.
How can I create a buy bind in CS2?
To create a buy bind in CS2, start by opening the console in the game. Type the ‘bind’ command, followed by the key you want to use, and the specific item you wish to purchase. For example, typing ‘bind F1 “buy ak47″‘ will assign the F1 key to purchasing an AK-47. Be sure to enable the console in the settings if you haven’t already. Advanced players often tweak binds in their config file for more customization.
Why should I use buy binds in CS2?
Using buy binds in CS2 allows for quicker and more efficient purchases during the buy phase. This gives you more time to discuss strategy with your team or position yourself for the start of the round. In competitive matches, where seconds can make a significant difference, buy binds help ensure that you are well-prepared without any delays or errors from navigating the buy menu manually.
Can buy binds include grenades and other utilities in CS2?
Yes, buy binds in CS2 can include grenades and other utilities, such as armor or defuse kits. For example, you can create a bind for a smoke grenade by using the command ‘bind key “buy smokegrenade”‘. Players often create combinations of binds for different equipment sets, tailored to specific strategies or roles within a team, making the buy phase highly efficient.
After you shortlist a finish, compare live CS2 skin prices on CSOffer me and complete the trade on Skin.Trade.